
The last trip I did in August was a trip to Austin, Texas. I stayed with my good friend Noah Kagan, who happens to have two pinball machines in his house. I’ve never really understood pinball, having only played it a handful of times in my life. But my wife and I ended up playing Godzilla pinball twice a day, competing but also encouraging each other and trying to figure out the strategy.
At some point, for some reason, I had researched virtual pinball tables. Companies make these tables that are the same size as a real pinball table and have the same controls, but instead of a mechanical playfield, they have a monitor. The problem is that the tables cost at least $5000 and tend not to use the quality of hardware that I thought would make for a good experience.
Maybe I should make a pinball table, I thought. I have a couple extra monitors of an appropriate size, an extra gaming PC, and some plywood. I could probably whip something up for next to nothing in a few days…
I had some other projects I wanted to do and a couple others to complete, so I decided that I would stay in Vegas for about a month and get stuff done. This also coincided with some friends being in Vegas, and the beginning of the NHL preseason. I also found that rather than constantly looking forward to the next trip, as I usually do, I found myself looking forward to the next time I’d get to be in Vegas.
Here are the projects I did in September, along with some thoughts on them.
Projector Screen Beam
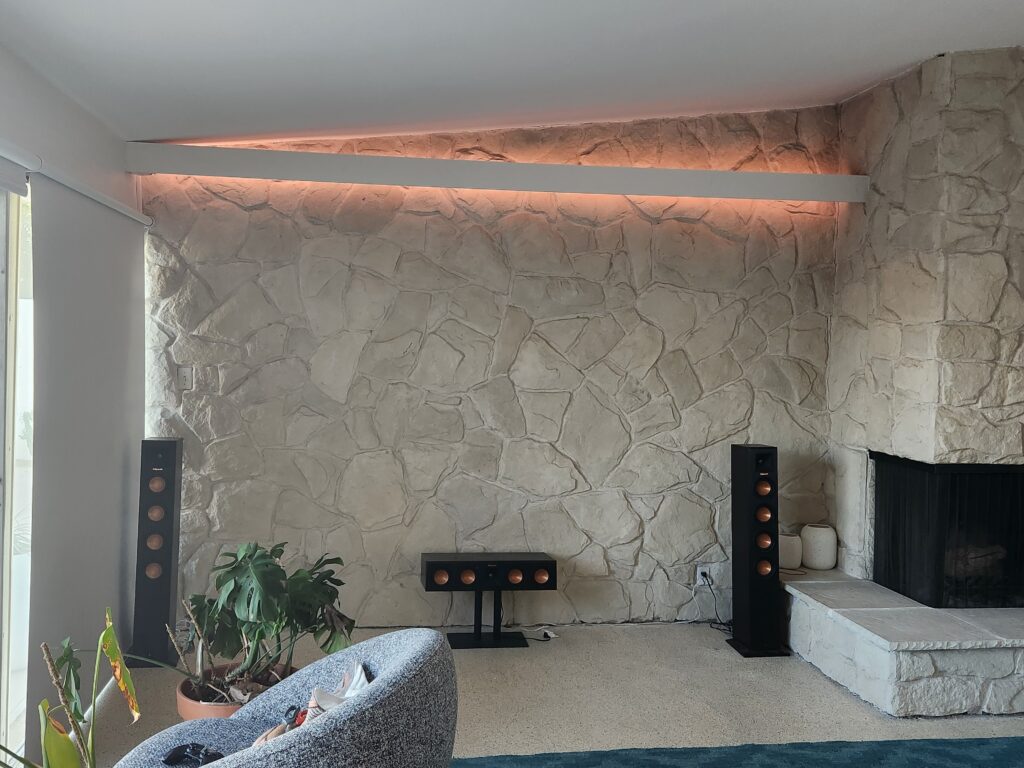
Years ago, when I lived in my old condo, I found someone on Craigslist selling a $1700 in-ceiling projector screen for $300 or so. I went and bought it, only to discover that my rafters went the wrong way for actually installed it in the ceiling. And, sure enough, when we moved it still had to be oriented perpendicular to the rafters.
I bought some 1×6 pieces of wood, and built a box for it. One side was attached directly to the wall, but the other side would have been up against an irregular stone surface. Eager to avoid the challenge of mating the wood with the stone, and also happy to buy 12 foot boards rather than 16 footers, I hung the box from the ceiling with a metal cable and just had a 3-4″ gap between it and the stone.
Most guests either didn’t notice or were polite enough not to say anything about the gap, but my siblings constantly harassed me about it and wanted me to take it down and rebuild it.
A few weeks ago I came home from a trip, walked into the living room and thought, “Hmm… something looks different here”. A few seconds later I realized that the projector screen and beam had fallen down. Luckily the things that got smashed on the way down were either replaceable or fixable.
If I was going to have to fix the beam, I thought, I may as well go wall to wall. So I designed a new system, 3D printed some custom french cleats for each side, got a contour gauge and a fancy 4-beam laser level, and built the beam the way it probably should have been built from the beginning. By absolute random chance the face of the rock to which I had to adhere it was almost flat, so it was easy to build it without a gap. My siblings are happy now.
Hot Tub Controller
Months ago, back when it was actually cold enough to use a hot tub regularly, the “temperature up” button on our hot tub broke. This wouldn’t have been much of a problem, since we generally keep it at the same temperature and I was already controlling the temperature using a smart plug since the thermometer had also broken, but while diagnosing the issue I hit the down button too many times, meaning that the hot tub could never get above a tepid 96 degrees.
Replacement controllers were about $100, which felt like a rip off to me. I finally ordered one, but when it arrived I realized it was for a similar but not quite the same hot tub. Annoyed with both the hot tub and myself for not researching enough, I decided I was going to take things into my own hands and design my own hot tub controller.
I bought an ESP32 board, and learned how to use it. These things are absolutely incredible. For $10 a pop they have built in bluetooth, wifi, storage, tons of header pins, and are easy enough to program in C++. There are many great libraries for them, so you don’t have to figure out how to make it connect to wifi yourself.
Components for them are just generic components like LCDs, 8 segment displays, standard thermometers, etc., so most things you’d want to add to them just cost a few dollars. Within a week my desk was messier than it had ever been, littered with different buttons, displays, thermometers, etc.
I had a fully functioning interface with button and a two line screen, but I couldn’t come up with an acceptable way to package it on the surface of the hot tub and make sure it was waterproof. Eventually I had a trip coming up and I didn’t want the hot tub water to go stagnant, so I got rid of the display and just controlled it with wifi. Without time to properly integrate the circuitry into the old case, I left the guts of the controller on a piece of wood next to the hot tub and put a bucket over it to keep it dry.
Then we had the craziest storms I’ve ever seen in Vegas, and the thing got destroyed.
Ok, fine, I thought. Time to finish it. I settled on a design I had been toying with before. The visible portion of the controller appeared to be a solid black piece of plastic (printed in 3D), but behind less than a millimeter of the plastic was a matrix of red LEDs to provide a simple screen. Rather than add buttons, I used an accelerometer to do tap detection. One tap turns the light on and off, two taps turns the pump/heater on and off. I never change the temperature when I’m in the tub, so I left that as a wifi-only feature. I managed to fit all of the circuitry, relays, and wires into the old case and make it so that I can update the software over wifi.
I build a bunch of cool features like automatically running a cleaning cycle after 6 hours of inactivity, turning the light off after an hour of inactivity, and freeze protection. I installed a new light into the lighting recess and put an RGB bulb in it that can be controlled over infrared. In the next iteration I will probably hide an infrared emitter in the controller and use it to slowly fade colors like a James Turrell experience.
Pinball
I propped up my previous two computer monitors, which I can’t trouble myself to sell, but are useful and valuable enough that I keep them around. One is 39″ and one is 43″. I leaned one up against my wall and propped the other one up on a couple 2x4s to raise it a few inches above the ground. I installed the pinball software on a computer I had previously used to mine ethereum (and thus it had a good graphics card). The experience was exactly on the line of being enjoyable enough that I thought it was worth building a full cabinet.
The playfield monitor is at a fairly extreme angle, since you are looking at it from the side, so the colors were washed out. And, at 60Hz (frames per second), the ball didn’t move fluidly enough to convince me it was real. On the other hand, I found myself sitting on the floor several times a day to try to get further in Attack From Mars.
I did more research. The ideal monitor is the LG 43″ C2 OLED. It runs at 120Hz, has HDR, is 4k, and is pretty much the exact correct size for a pinball playfield. The problem is that it’s $1200. I couldn’t get myself to plunk down that much cash for a pinball machine that I wasn’t even fully committed to building yet.
I searched around Facebook Marketplace and Craigslist, though, and found its predecessor, the C1 for $400. In all important ways the specs were the same, but the smallest one was a 48″. There were a couple mentions of people using monitors this big for pinball online, so I decided to go for it. I drove across Vegas and bought the TV from a guy’s living room.
As soon as I hooked it up, I knew that I was going to build the pinball cabinet. The 120 frames per second made a day and night difference, the colors were rich ever from the playing angle, and the tables just looked great.
The biggest problem remaining was that I had nowhere to put the table. My tea room is large and has plenty of space, but if there’s anything that’s the opposite of a tea room vibe, it’s pinball. I could put it in my wife’s office, but it’s already become a graveyard for purchases that I make that she won’t let me get rid of (like a full electric piano), so I decided to only put it there as a last resort.
Then, I thought, what if I designed a table that was much shallower and could be affixed to the wall in the closet of the guest room? We don’t use the guest room most of the time, so it could be folded out normally, but then it would hinge upwards when we had guests. I got to work on Sketchup and confirmed that it would work. Rather than 15.5 inches in front, mine would be only 4. It would have the same slope as a normal sized cabinet, as if the bottom 8 inches were cut off.
I got the plywood and built it in the living room, since it was too hot and sunny to do it outside. Building the actual cabinet went really well, with relatively few hiccups. Getting the paper thing but very heavy monitor centered was the biggest challenge. On a lark I put in a gas spring so that it could pop up and open like a car hood, thinking “I’m pretty much done, but maybe I’ll need to get in here in the future”. Little did I know just how many times I would open it.
Most people put 8-10 solenoids in their cabinets. A solenoid is a mechanical device that uses a magnet to move a rod. They make the characteristic loud thunk noises you hear in real pinball machines, as they move flippers, bumpers, and singshots. I wasn’t sure how deep down the rabbit hole I wanted to go, so I decided not to use solenoids. Instead I did something called SSF, which is essentially four “actuators”, which are speakers that screw into and shake physical materials. They are arranged in the corners of the cabinet and the table uses them as an internal surround sound matrix to mimic the internal noises of the pinball machine. It is uncanny how well it works.
Not fully understanding what every part was, I ended up accidentally ordering a device that acts a bridge between the computer and any lights you may not have on the cabinet. It has 32 slots. A regular light uses one, a light that can change to any color (RGB) uses three. I had zero used, but I had an extra leftover piece of LED strip lighting, so I hooked it up as an experiment. People have literally programmed color changes for every major action in every game, so it immediately made the room flash in tune with every game.
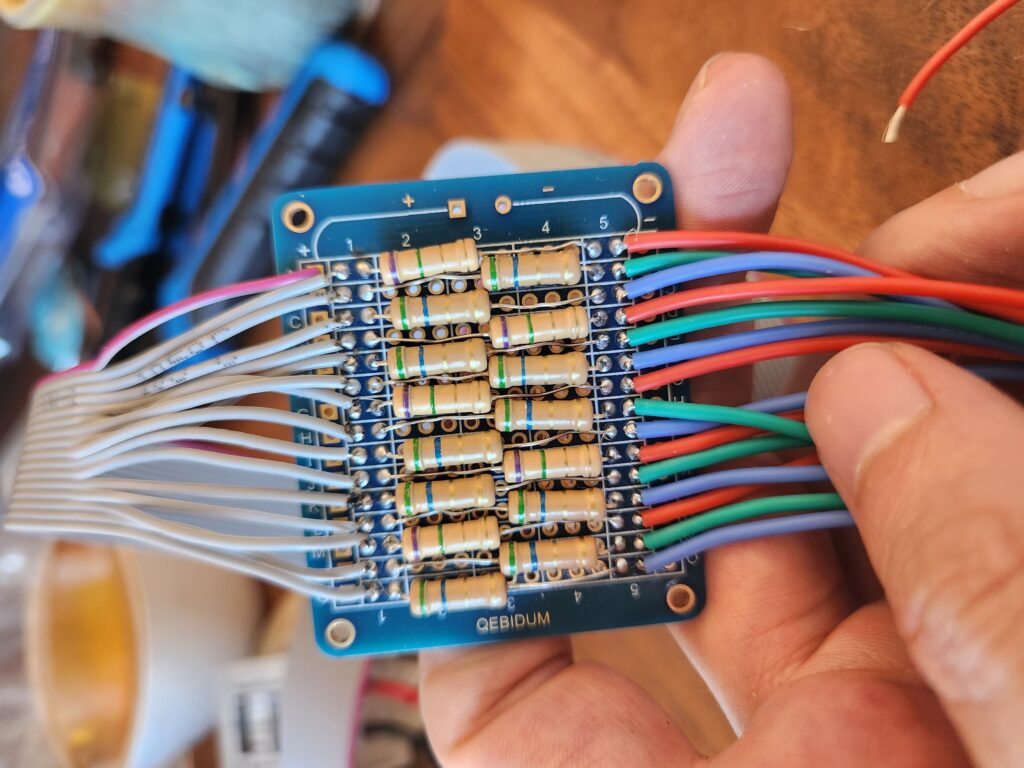
Fast forward, and now I use all 32 slots. The flipper buttons light up to the correct color for each game, I have two bright white strobe lights aimed at the player’s face, and I even spent 10 hours hooking up 5 physical flashers at the back of the cabinet (and designed and 3D printed mounts and lenses for them in the process). The result is almost an overwhelming amount of stimulation that really brings you into the game and bridges the gap between a virtual pinball machine and a real one.
Things were going well and I was heading towards the finish line. The time had come to move the pinball machine off the floor and mount it onto the wall. I built a small box to screw into the studs of the wall and attached a piano hinge. The box was just deep enough to hold the other monitor, which shows the game art and scoreboard, behind the playfield.
I screwed the box to the wall and just as I was about to go get the cabinet I had a shocking realization– I had never actually measured the vertical clearance. It looked like the cabinet would fold up on the hinge but wouldn’t be able to clear the top of the closet’s sliding door frame. I grabbed a tape measure and confirmed… there was no way it would fit.
I considered lowering the machine, but then it wouldn’t feel like a real pinball machine. I thought about cutting through the door frame. I thought about moving it to a different room. I very nearly cut a massive chunk out of the wall to embed the entire back part of the machine in the wall, but I still would have had to lower it by a few inches. I asked twitter to see if anyone could design some sort of double-pivot hinge that would lower the machine as it folded towards the wall.
Then I finally had an idea that seemed like it had promise. What if I could find some sort of motor to lower it temporarily, fold it up, and then raise it? At this point the project had been all consuming for a week or two and I knew that I was well beyond the realm of reason and so far from the original vision of slapping something together with spare parts I had lying around. After a bunch of searching, I ordered a TV lift and figured I could repurpose it.
Shockingly, it worked almost perfectly. It’s strong enough to raise and lower the TV. It’s only weakness is that it allows the table to sway too much left and right. To solve that I bought leveling feet, attached them to the back box, and aimed them towards the wall.
I’m still waiting for some custom metal stuff for the top trim, and after that I’ll have to custom order a piece of glass, but besides that the table is pretty much done. What kept me going through all of it is that every time I was frustrated I would play a few games of pinball and it just kept getting more and more fun. The best part was being able to play with friends. Every friend that came over immediately got into pinball.
I love doing projects. Even though I took no flights for a month, September was one of the most enjoyable months of my year. It’s just so satisfying building something with your hands, and trying to solve the inevitable problems that come up is like navigating an escape game.
Two things really stood out to me during the month. The first is that it’s incredible what you can manufacture at home these days. In particular, the hot tub controller feels very close to a commercial product, but was really easy to make. 3D printers plus cheap general purpose electronics like arduinos, ESP32s, and even raspberry pis open up nearly infinite possibilities.
The second thing that stood out was how if you’re stubborn enough, you can generally figure out how to do something. I was pretty set on having a really shallow pinball table that would fit inside that closet, and even though there were some frustrating roadblocks along the way, I figured it out eventually.
###
I’m finally in Tokyo again after 2.5 years! What an amazing and bizarre feeling.
Leave a Reply