Whenever I pass by a Home Depot in the RV, one thought pops into my mind: are there any projects I can do? I love working on my RV. Since the last update, where I put in maple and marble floors and improved the kitchen, I’ve done quite a bit more. Following is a list of some of the improvements, along with notes to help you if you decide to do something similar. Check out the video walkthrough first:
Super Classy Kitchen and Countertops
Let me attempt to fend off the inevitable criticism that this upgrade is excessive by saying this: I agree with you. I have a tendency to go overboard when it’s only marginally more expensive, especially if it’s going to be fun. This is a really good example of this.
The crappy particleboard laminate countertops of my RV weren’t designed for daily use. As time passed, water seeped into the cracks and started bloating the counter. This looked really crappy. I also really hate synthetic materials, so I wanted to get granite countertops.
I did some measuring and was excited to realize that I could use just one prefabricated granite slab and cut it to fit both the kitchen and the counter next to the bed. If I had to buy multiple slabs I’d be inclined to buy the cheapest granite possible, but since I only needed one piece, I was willing to splurge a bit.
After weeks of deliberating on which granite to choose, my friend Lara came with me to pick one out. It just so happened that one we decided on was Brazilian granite. I was excited about that because the awesome lady who owns Moya (my favorite Ethiopian restaurant) knows everything about granite and she told me to get a Brazilian one.
We picked out the stone and Benji from Cornerstone Home Design set everything else up. The very next day he sent two guys out to my RV and they actually fabricated the granite in the spot between my car and the next. Awesome!
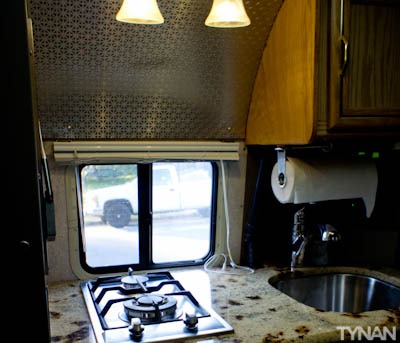
After a lot of deliberation (I really wanted the Fagor 12″), I chose the Ramblewood Green propane stove to replace my old one. My old one was functional, as was the sink, but I figured that if I’m going to cut out holes for these things, I should get the best units I could. The new stove has two burners, one being really powerful for fast boiling and the other for a controlled simmer. The grates on my old stove were melting, but the new stove had nice cast iron grates.
Unfortunately, I got a little over-eager when buying a sink and got a huge one. It was so deep that its drain was below where the water was supposed to drain. I know nothing about plumbing, so luckily my dad was coming through San Francisco. He saved my life and helped me install the sink. The installation isn’t quite as clean as it would have been if I bought an appropriately sized sink, but I’m really happy with it. It’s great to be able to fit my whole pan in the sink.
To polish it all off, I got a single hole sink, which I’m surprised isn’t a standard RV feature. Why waste the space for a three hole?
Electrical System Upgrade
I don’t have much of a need for 120V AC service (the kind of electricity you have in your house). The best strategy for RV living is to run as much as humanly possible off 12V DC. Every time you convert between AC and DC, you lose power to inefficiency. So my laptop has a DC adapter, my camera charger has a DC adapter, my fridge is on DC, and my phone charges from DC. However, there are some things that require AC power, an electric skateboard in my case.
My first inclination is to buy a cheap inverter and just plug the skateboard charger directly into it. But then my mind starts pondering what the best power scenario is, and before you know it I’m going overboard.
There are two kinds of power that inverters put out: modified sine wave and pure sine wave. Modified sine wave is easier, and thus cheaper, to produce, but it’s not really what things are designed for. Some chargers won’t work, and interference is introduced to things like TVs and stereos. House power is pure sine wave. Pure sine wave inverters are significantly more expensive, but if you’re going to do something, do it right.
Every inverter is rated in watts, denoting the maximum amount of power it can deliver at once. I went with the Xantrex Prosine 2.0, a 2000 Watt Pure Sine inverter, mainly because I found it for 30% of its eBay price on craigslist. How can you turn that down?
The key with an inverter is to wire it directly to your circuit breaker box. That sounds hard, but it’s really not. All you have to do is find the two wires coming from your generator and/or shore power lead. They’re going into the breaker box and then are screwed down to the breakers. Just unplug them, cap them for safety, and run a heavy extension cord from the inverter to the terminals they were screwed into. Now when you turn on your inverter, all the sockets in the RV will work.
The one thing you have to watch out for is to make sure that the AC battery charger, used by the generator and shore power to charge your batteries, is disconnected. If it’s on a circuit, just flip that breaker off (along with any other circuit you don’t have the power for, like the air conditioner, perhaps). If it’s not on a circuit, you can just cut the wires to it.
I managed to fit my giant inverter on top of my fridge underneath the stove. To get it in there I had to remove the stove and the track for the silverware drawer. Now it’s totally hidden away, but can be controlled from the remote panel that I mounted near my sink.
I had two mismatched solar panels which I removed and replaced with high efficiency 230 watt panels, running in parallel. Unfortunately San Francisco gets about 25% as much solar energy during the winter as it does during the summer, so even with 460 Watts of solar capacity, I have to be a bit miserly with my consumption.
I also upgraded my solar charge controller, the gadget that regulates the current from the panels and properly charges the battery, from the Rogue 3024 to the Bluesky 3024iL. The capacity is (basically) the same, as is most of the functionality, but the new one has a remote display panel. It’s connected to the battery via a shunt, which allows it to monitor the current that goes in and out of the battery, giving me an accurate percentage “fuel gauge” so that I know how much charge the battery has left, and also lets me monitor how much is being drawn or put in at any time.
Speaking of monitors, I also replaced the notoriously faulty tank monitor with a SeeLevel. Traditional tank monitors use probes in your tanks which indicate empty, one third, two thirds, or full. This lack of granularity makes them very nearly useless. SeeLevel sensors are stuck to the outside of the tank and they read the level within three percent through the walls of the tank. Unfortunately I didn’t realize until after purchasing the sensors that my grey and black tanks are too small and too covered in metal to work. Oh well. Because my tanks are proportionally sized and used, the fresh water tank inversely mirrors the remaining capacity of the waste tanks. And it’s very useful to have my propane levels within three percent, because if I run out I’m unable to use my heater.
And last for electronics, I replaced all of my bulbs with LEDs. I had experimented with low wattage incandescent lights, because incandescent light is warmer and more pleasant, but the bulb filaments were unable to stand up to the rigors of driving. My driving, at least.
Stereo
I’ve learned the hard way that car stereos can be a slippery slope. At first I completely disregarded my stereo because the rear speakers were blown. Listening to music was painful. Finally fed up with not being able to plug in my computer to the speakers, I bought some cheap but decent speakers from Overstock.com to replace the back speakers. So happy was I with having non-blown speakers, that I bought a moderately priced head unit and wired it to the RV batteries.
After a while I got sick of my phone serving as my GPS, music player, AND phone while driving, so I decided to get a stereo with a built-in GPS. I settled on the Clarion NZ500. The flip up screen is nice, I love the Sirius satellite and iPod integration, and the GPS is decent. It will get you there, but maybe not as nicely as a Garmin or TomTom unit. I routed the iPod cable into an ashtray so that I can put the ipPd in there, plug it in, and close the ashtray.
After installing the NZ500 I had great sources of music, the iPod and Sirius, but had no bass whatsoever. A good eighty percent of what I listen to is Gangsta Rap, which was left sounding tinny and sad. A few hours of research later and I bought an entry level JL 12″ subwoofer and a 300 Watt four-channel Alpine amplifier.
But where to put the subwoofer?
Well, ever since I bought an Olympian Wave 6 (link is to the smaller one that’s more appropriate for the Rialta. Wish I had it instead) catalytic heater last year, I haven’t used the rear heater in the RV. So I took it out and built a subwoofer box in the parking lot of Home Depot which just barely fit in. The subwoofer is recessed 3/4 of an inch into the cabinet so that it won’t hit the bathroom when it’s pulled out. Of all the projects I’ve done in the RV, this is one that I’m most proud of. The subwoofer sounds hilariously good to me. I doubt many other RVs have large subs in them.
Second Monitor
The next project I tackled, I’ll admit, was mostly fueled by the knowledge that I’d be putting out this post soon. I wanted to do something over the top that I hadn’t seen done before.
Anyone who has read my gear reviews probably knows how obsessed I am with resolution, especially on my laptop. It’s the one spec that directly improves productivity. And we all know the best way to increase resolution is to add a second monitor.
So I bought a 23″ LED lit LCD TV and mounted it above my desk on a 22″ reach Ergotron LX arm. It connects via HDMI and can be positioned directly above my laptop to serve as a second monitor. All of the wires going to it are routed through the wall for a clean installation, and I put some metal loops into the wall to secure it with a bungie while driving. At first I had the arm mounted to the plastic fascia of the RV, but it wasn’t particularly secure, so I later removed the wall, inserted a 3/4″ thick piece of wood as a spacer, and shot metal screws through the mounting holes, through the wood, and into the metal support behind everything. Now it’s solid as a rock (Solid as Iraq).
I don’t always have enough power to justify using both monitors, especially in the winter (I accidentally bought a monitor that requires AC power), but when I do, it’s a real pleasure to use.
Because the arm lets me move the screen in any direction, I can also move it closer to the bed to watch movies (and, of course, pipe the sound through the sound system via bluetooth), or flip it around to be viewable from the flipped-around front seats. Very versatile! At some point I’ll replace it with a Vizio TV because they can be easily hacked to run off 12V. If you try to do this in your RV, don’t get a Viewsonic.
Lower Roof Fixtures
I found the perfect spot, close to the spa I visit every day (showering in the RV isn’t great), and only a block from Samovar. The second night I was there, the police knocked on my door. Neighbors were complaining. I think that this is ridiculous to begin with, but it was easy to pass at least some of the blame onto the high profile of my RV.
Above my air vent I had a MaxxAir rain cover so that I could get fresh air even when it’s raining out. The problem with that is that even when the vent is closed, the MaxAir stuck over a foot off the roof of the RV.
Worse, of course, was the air conditioner and solar panel contraption I had. The air conditioner dominated my roof space, so when it came time to install solar panels, I went vertically. I built metal mounts for them that raised them up above the air conditioner. It worked perfect, but it looked pretty sketchy and definitely moved my rig a couple notches to the right on the van -> RV continuum.
So I first removed the air conditioner. Easy enough to do- just unscrew the inside part first, then the outside part, then pry it off the roof. I put a piece of metal over the remaining hole, but when helping a friend with hers we used plexiglass, which creates a cool sunroof sort of effect. I then mounted the solar panels directly to the roof, which makes them barely visible from the street.
I removed the MaxxAir and vent fan and bought a MaxxFan which is a retractable fan with a built in rain cover. It also features a thermostat and a remote control, which are nice features. The thermostat is especially useful when it’s warm in the day but cool at night.
These two modifications made my RV look a lot better, weigh significantly less, and took a foot off my clearance, which means that I can actually fit in some parking garages now. Just not most of them.
New Light Fixtures
RV manufacturers know that they’re building “homes” that won’t get much use, so they don’t put the highest quality fixtures in. In fact, they put the lowest quality fixtures in. Each light is a cheap white plastic unit with one or two bulbs in it. I found a company on ebay who sells cheap high quality fixtures made of glass and metal. I replaced all of mine, and it made a big difference. I especially like my kitchen light, which has two bulbs instead of the old single bulb design. A word of advice: don’t get a chandelier like I did originally. Mine ripped itself out of the ceiling while I was driving down the freeway.
Weighing your RV
By the way, it’s important to not go over the recommended weight for your chassis. To weigh your RV, go to any truck stop and enter the CAT scales. They’re made for trucks, but they’ll get the job done. As I’m adding things, I’m constantly taking out old things (heater, awning, generator, etc) to counterbalance them.
Future Projects
I guess that’s about it for RV projects. I’d like to come up with a better desk situation. The built in one is handy, but it’s small, has a seam in the middle, and falls out while I’m driving (it’s broken).
I bought a small propane water heater that I’m going to replace the old electric-only one with, but that might take more expertise than I currently have. I’m sure that won’t stop me from trying, though. My main impetus to do this is currently the fact that it’s taking up a huge chunk of my storage.
On the roof is a rotating TV antenna. I’ve thought about hooking it up to my second monitor for free over-the-air TV, but I don’t actually like TV, so I doubt I’ll do that. I’ve also been throwing around the idea of putting either a wifi or 3G/4G antenna on the top. My favorite parking spot has a weak wifi signal that I could use if I had an antenna, and terrible 3G reception that almost requires an antenna to be functional.
The holding tank situation on the Rialta can best be described as pathetic. Underneath are two tiny little tanks, one for the sink and one for the toilet. More than once I’ve thought about buying a much larger tank and replacing both of them with it. This would be extremely difficult given the low clearance of the vehicle, but if I had the right workspace, I might just give it a try.
And I think that just about rounds out my wishlist. I’ve done most of the things I can think of doing, and although I do have a few way-over-the-top ideas, I’ll keep them to myself until I start working on them.
If you’ve done any cool RV mods, I’d love to hear about them. Tommy from the forums was the first to remove his AC and put solar panels on flat, and seeing what a good job he did motivated me to do the same.
###
Yesterday long-time reader Elai suggested more frequent posts. Boom! Three times a week from now on. Monday, Wednesday, Friday.
Not much else to report over here… just hustlin’ and getting ready for China/Japan.
Leave a Reply